Showing posts with label modification. Show all posts

Saturday, June 18, 2011

Breakin' the Law


Smashy smashy!

Part of my preparation for the long-ass trip to Florida was to stiffen up my car for the excessive load it would carry. That meant I'd install Flyin' Miata's frame rail reinforcements, to hopefully undo the damage I've done to the stock frame rails, pictured. It turns out they're not intended to be jacking points. I was hoping the FM rails would also cure my notorious Miata shimmy. (It did not.)

The install itself was pretty straightforward and didn't take a whole lot of time. I spent a bit more than half an hour with a hammer pounding the old rails approximately into shape. My dad showed up to help, so he sprayed the holes with undercoating from inside the car while I drilled from underneath.

It's tough to get undercoating off your face. Ask how I know.

Tip: Make sure your face isn't on the other side of an aerosol can.

It does make a difference.

After putting everything back together, the difference is immediately noticeable. Well, it was on crappy Illinois roads. It's not perfect -- it didn't go from a floppy NA to an S2000 -- but I'd call it much improved, not a gimmick product. I don't know how it affects lap times, but I will say that I hope no one at the autocross course notices. This is definitely not an SCCA-legal modification, but I'm going to keep running in the same class as before. That's right, I'm a rebel. Breakin' the (inconsequential) law.

Monday, November 8, 2010

Did you expect something classier?


I got under my car to fix my broken exhaust hanger for a second time. The strap I used before broke shortly after I got this car back on the road. I took this opportunity to put in a new muffler.

So I grabbed a Thrush Turbo universal muffler with 2" ID connections. Since the Miata's stock piping is 1-7/8" OD and I, of course, was too cheap to buy adapters; I just stuck exhaust clamps on and cranked the shit out of them. I sealed up the gaps with muffler cement. I cut the hangers off the other muffler and welded them on the new one, but I welded the inlet-side one (that was broken off the OEM muffler) in the wrong place. It was late, the sawzall blade was shot, and I'd lost interest in perfection in my already ghetto setup, so I did the strapping job again on that side. I may revisit this oh who am I kidding? It's gonna stay shitty forever.

I had a glasspack on the ZX2 for a long time and it droned unbearably while cruising, which is why I went with a more normal muffler. I have a long commute.

This setup is quiet at idle and even at a fast 4,000 RPM cruise (at 80 mph). No booming, no droning; perfectly civilized. It rips pretty nicely when you're on the gas above 3k RPM. No, it's not a classy burble and it's not a low tone by any means, but I'm enjoying it. I'm sure it's not good for my gas mileage.

Horsepower? Pfft. Who cares? It's quiet when I want, loud when I want, and the pipe doesn't bang on the subframe brace anymore. I call that a success.

_____________________________________

In other news, I'm now using the wet weather tires from my LeMons racer on the Miata. They're taller than stock by about 1.5 inches, which means they rub the fenders and fender liners often. But they look nicer than the shitty 13" steelies I had on before, give much better grip, and best of all, don't make the car shimmy at highway speeds like an alcoholic detoxing.

I also switched oil to Castrol 20w-50, and it has stopped burning oil entirely. Gas mileage also dropped about 15% (to ~27 mpg), and anyway that heavy oil isn't ideal for winter. I'll be searching for a happy medium with my next oil change.

Wednesday, April 14, 2010

a few minor updates


My cheaptastic steering wheel wrap was starting to get pretty nasty, so I reapplied with what I had left of a roll. The old stuff peeled off fine and the new stuff looks much better. I was surprised at how quickly this thing got nasty. The part I took off actually looked worse. It was practically black.

Steering wheel athletic wrap: reapply every 6 months or twenty thousand miles. Darker colors may last longer.

In other news, my PCV valve split in half. The hose basically held the top part in place on top of the other half. Never seen that before. I replaced both hose and valve.


In still other news: you may have noticed a thin red line with a dot at the end appearing on the right side (or bottom, for vertical shots) on some of my photos. That's new; it makes me sad and angry, because I like my camera. It's fairly noticeable on the top photo in this post. Look for a red line running up from the bottom, about a quarter of the way from the right side. This is my camera's fault. I don't know what I should do to fix it, if anything, or just deal with it. I can't justify buying a new camera. It would probably cost nearly as much to fix this one, since I'm not skilled in the ways of digital camera voodoo. This will have to be copacetic. I'll pretend it's my watermark.

Tuesday, March 30, 2010

GoMiata Stubby Antenna - And Another Thing...


As though I didn't have enough bad to say about the GoMiata Stubby Antenna the first time I reviewed it, the thing goes and gets even worse on me.


At least then it passed the 30-foot test. But after just one winter of handling road salt, the thing is getting corroded and looks like garbage.

If I get excited later on, I'll clean this thing up and spray on some clearcoat. But it pisses me off, because that's not something I should have to do with an accessory that's only a few months old.

Wednesday, February 24, 2010

Another 9-hour round of cussin' and knuckle-bustin'


(Amanda tells me we're both stubby nerds. It might be true.)

Ah, the fruits of our labor! At least, the first 3-hour stint. These Saturday projects seem to be forming a pattern. The pattern is: We start taking things apart. A few things break, but in general progress is good. We move on to the donor car, and maybe run into a few more snags, but again, we're not deterred. We take a break, then continue, everything goes to shit, and what we thought would take maybe another two hours ends up taking six. At the end of the night the car is back together, but perhaps barely drivable. Usually the final problem has to do with brakes.

I have a problem, as Eric points out, of 
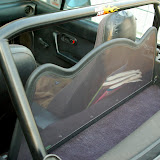
misunderestimating the scope, difficulty, and time involved in car-related projects (click the link to Eric's blog; you will not be disappointed). The goal last weekend was to drop the rear subframe from both cars, and bolt the donor (ZX2) subframe onto the racer (LX, subframe pictured above). Not only was my grasp of the simplicity of this project on two cars that combined are about 31 years old vastly incorrect, we made some excellent discoveries on the way.


This is how awesome one of our rear strut towers is. You don't have to be a trained anything to know that if your car looks like it has syphilitic diarrhea leprosy, that's probably a bad thing. Notice the burns on the seat! Of course, the problem is not isolated to the passenger side.


There's your driver-side strut tower. My dad's repair idea involves not welding, but having someone cut a thick steel plate (with proper holes in it) to place between the strut hat and the tower, to spread the load to outside the rusted area. It would increase ride height by however thick it is, but that's probably not a very big deal -- assuming the tech/safety inspectors don't give us a hard time over it. I worry, often needlessly.

These old Escorts had a propensity for breaking rear springs. This example is no exception.


Into three pieces. Notice also the strut hat for that side (which fell on the floor).


Practically disintegrated, and virtually useless at this point. Where's the rest of it? Here:

(Note the emergency brake cable, which has lost a battle with Captain Hacksaw.)

Good thing we're swapping the entire rear subframe from the ZX2, for its springs, struts and disk brakes. I'd like to say the donor is less rusty. And it is. In parts. Notably the strut hat.

Unfortunately, the brakes again became a problem. Not only are the lines horrifically rusted from the master cylinder all the way back to the wheels, but the bleeder screws on those rear calipers snapped clean off instead of loosening properly. We replaced one caliper with a spare I had sitting around (don't ask), but the other side wouldn't come off. 

We rounded off the mounting bolt, which means we have four options:
Option 1: Get a whole new spindle to mount the caliper on. I don't want to get into how much of a pain in the ass (and expensive) this is.

Options 2, 3, and 4 condensed into one: Take either (2) a Sawzall, (3) a sledgehammer, or (4) a torch and cut/smash/melt the thing into two pieces and slide the caliper off. Then we can forcibly remove the mounting bolt with a drill, and use one of my many spare mounting bolts to attach the replacement caliper.

Obviously, we're going with one of the three latter options. Right now we've got one rear caliper that's been bled (poorly) and one that has nothing but air in it. The pedal goes to the floor every time, and requires several pumps before any kind of slowing down happens. And even then, it happens poorly.

I got a pair of used Miata calipers, which will bolt on but also feature a 32mm piston diameter (versus the Escort GT-sourced rears' 30mm). This should give us a bit more rearward brake bias, which will likely help get better, more even braking on race day. Evener braking means evener betterer lap times. I'm sure the brake proportioning is originally set up very conservative, so it's unlikely we're treading dangerous territory here.

Those calipers will go on in a few weeks. This weekend, rent is due, and I'm also spending time with my baby. I mean the Miata. Don't kill me, Amanda. I still love you too.

More details and photos to come, eventually. Stay tuned here and at assonancerood.blogspot.com for all your hot Escort-on-Escort action.

(Want a few more detail photos from that day? Click here.)

Tuesday, February 23, 2010

GoMiata Stubby Antenna

One of my Xmas gifts was this, a universal short chrome antenna from GoMiata. It's VERY short. I'm talking less than 6 inches. It's pretty classy looking, I suppose, but I have a few beefs with it.

Number one is radio reception. It's garbage. Complete garbage. It loses radio stations that are 15 miles away.  Compare this to the almost 40-mile range of the bent wire hanger I had in its place for the better part of a year. That's right, it's worse than a wire hanger.

I'm lucky that there's a machine shop where I work, and the guy who runs it is friendly and helpful. He drilled and tapped a hole in the center of the antenna, and screwed in a nut with a thin chrome-plated rod sticking out of it. It's about 3 times as long now, and reception is back to wire hanger levels. I'm happy now, but someone who doesn't have these resources will be very disappointed at the reception unless they live in the middle of a big city.

Another issue is how it looks when it mounts. Click the photo above and you'll see what I mean. There's all that black plastic and metal all hanging out and exposed, it's part of the original antenna mount. It doesn't cover any of this up, it doesn't exactly sit flush, and as a result it looks half-assed. Or, more aptly, it looks universal. Which it is.

And finally, for a poorly fitting universal antenna that gets shitty reception, it's expensive. It's just a small hunk of chrome and some threaded adapters for different antenna posts. I'm keeping it because it's better than a wire hanger, and it passes the 30-foot test. But as a good looking and functional detail piece, it fails miserably.

Update: This thing just keeps getting worse.

Saturday, January 9, 2010

Windblocker with Hard Dog roll bar


A few months ago I bought a Raceland "Windblokker" brand windblocker. The name's kind of silly, but it fits and it works. It's also stupid cheap.

But as I mentioned before, it did have one small problem: while it's made to tilt down, it's blocked from tilting by the rear supports of my Hard Dog Hard Bar Sport roll bar. With the convertible top up, it rendered the parcel shelf all but useless.

A few nights ago I got bored and decided to see if I could remedy the situation. I took a trip to Farm & Fleet and picked up a shelf repair bracket, a couple bolts and nuts, and 4 washers. The solution is so simple it almost assembles itself. It's nice to be able to use the shelf again.

Sunday, December 20, 2009

The Weak are Killed and Eaten

Special thanks to my friend Greg, who gave me this shirt for Xmas. I am determined to wear it to every single racing event I attend this year. Yes, it'll look to my autocross friends as though I'm a filthy, unwashed philistine. Or at least like I have no other clothes, because I spend all my money on racing. Which isn't far from the truth.

To be imprecise, I spent more than $650 on parts for my Miata on the 2 weeks following Thanksgiving. A mere 3 days after I replaced my broken differential with a fancy-schmancy viscous limited slip one ($220), the clutch failed. I took a day off of work and my dad and I replaced the thing along with the rear main seal. I also found out that the oil pan gasket in the area just below the rear main seal was leaking, and had been improperly repaired before with Permatex gasket maker spread over the area of the leak. Once I found out that dropping the oil pan for a proper repair involved basically removing the entire engine, I opted simply to clean off the old stuff and reapply. It's actually working. ($200, including various chemicals and supplies)

After this, I put on my snow tires (with heavier 14" steel wheels) and am reminded of the scary vibration at higher speeds. Specifically, at 70+ mph. I had previously tried to chase down this problem only to get tired of spending money after balancing all the wheels, replacing a wheel bearing, and replacing an axle. I knew the vibration was coming from the rear right corner, but I couldn't figure out what component had failed until the day I was doing the clutch. I wiggled that rear wheel, and there was play at the top/bottom, but not left/right. And I could see the axle move with the play, whereas the upright was staying still. This could only mean that the bore for the wheel bearing was distorted. I ordered a new one. ($80)

The following week begins, and my car needs a jump to start at any temperature below 40 degrees. I replace the battery. ($100) Starting improves, but its still very slow to crank and not exactly confidence-inspiring. I replace the starter, fearing sub-zero jump starts. ($60) Starting is solid.

My dad had picked up a new clutch slave cylinder for me sometime during all this, because while replacing the clutch, we noticed the boot on the slave was destroyed. My brother, Brian, helped me install the clutch slave on the same day as the starter. ($50, but my dad paid for it)

My family had Xmas early this year, on the 19th. My dad got me a pair of subframe braces from 949Racing. After the festivities were over, he and I went out to the garage, replaced that rear-right suspension upright (also called a hub assembly) and installed the rear brace. I'll find out for sure once I hit the interstate if the vibration is gone.

That's been the big maintenance lately. Posts coming soon regarding a brake job on the ZX2, my new not-made-of-a-wire-hanger-and-duct-tape radio antenna, and my brother's car crash. Don't worry, he's OK. The car is definitely not.

For a few more photos and details on the differential and clutch job, click the picture below.

diff and clutch

Posted by Picasa

Saturday, November 21, 2009

Leather steering wheels disintegrate


My Miata came with a leather-wrapped steering wheel. Which makes no difference to me, except on warm, humid days. Especially on dewy mornings in the spring, summer, or fall; even worse if I left the top down overnight.

What happened? Well, the leather (I think it's leather, anyway) would get moist and start to come off on my hands. I could merely grab the wheel and gross black shit would stick to my hand. It would look like I had an afternoon under the hood, but without the thrill of actually swearing at every stupid bolt under the hood fixing something. Once dry, everything was fine.

My attempt at a cheap repair involved, easily enough, baseball bat grip tape. This stuff is sold at most sporting goods stores as exactly that, though it also works for sports injuries. They label it "athletic tape," and it comes in a small variety of colors, about $4 a roll. I suggest something bright and garish. Amanda bought me one in orange. One roll is enough.

This stuff is easy to use and looks fairly good when you're done. I suggest getting a full overlap as you wrap it: The black shows through with just one layer.

Since it's also made to attach to body parts, you can remove it later on when you get tired of the color without destroying your steering wheel. It's a good low-buck upgrade, and it'll keep the black shit off your hands.

UPDATE: Looks like it lasts about 20k miles before getting 100% nasty.

Saturday, November 14, 2009

Raceland Windblokker (windblocker)


Windblocker

I bought a cheap windblocker from Raceland at the same time as the header. Their brand name for it is Windblokker. Whatever.
I bought their "V Style" windblocker because it's $10 cheaper than the standard model. One of the features of this windblocker is that it tilts down flat, and I thought the V-style, which comes in a bit at an angle on the sides, just might give me enough clearance to get past the rear braces on my Hard Dog Hard Bar Sport roll bar.

Unfortunately, it won't tilt down far. The rear roll bar braces still get in the way, so I do lose that functionality. Other than the tilt though, it fits just fine. It's not really a big deal. It's so stupidly easy to install anyway, I could just remove it if I need to. Click the picture above to see pictures and read details on the thing.

The windblocker does its job well. I can drive with the top down when it's 40 degrees out. It's significantly quieter in the car, and I don't get blasts of air shooting into my right ear. When Amanda called me on my cell phone, she had to ask if I was driving, because it was unusually quiet. I'd call that high praise. If I had to do it again though, I would probably have splurged on the more expensive model. It would probably look better, and work better.

Update: I've rigged up a bracket to give it enough clearance for full functionality with the roll bar.

Tuesday, November 3, 2009

Raceland header wrap & install


Updates at bottom.
This weekend, I installed a new header in my Miata. I bought one of the very inexpensive ones you can find on eBay, though I went through their Web site. (I also bought a windblocker; details on that later.)
For the incredibly low price of $80, I felt like the Raceland unit (part number RO-HMX5NA-1.6) was worth the gamble. I also bought some generic header wrap on eBay for $25, and a new oxygen sensor on RockAuto.com to accompany this project. This modification is legal in the SCCA's autocross STS class, which means I have nothing to lose.


The installation, unlike nearly every other major project I've taken on, went without a hitch. I had no major difficulties, outside of one bolt I had to snap off. Nothing was too difficult to get at, or too hard to remove. I didn't even have to run back out to the store. It was surprisingly painless. I've heard that the 1.8 liter models have more fitment issues, but everything was fine on my 1.6L engine.


Click the photo above to go directly to my Web photo album. There are some close-up pictures of the header, details and tips for the installation process, and a surprise crack I found in my original header.


It's quieter at cruise than my OEM header (probably thanks to that crack), though it sounds racier at WOT and at higher revs. It's also smoother and stronger in the middle and top end. I won't attribute all of this to the header alone; the new O2 sensor and the wrap probably helped a lot too. All in all, I'm very satisfied. If I had spent $450 on the Racing Beat or Jackson Racing headers, I don't think I would've been as happy. This is a significant improvement for a little price. Kudos, Raceland.

Update: The header wrap didn't seem to like snow very much. http://sentimentalmechanic.blogspot.com/2010/06/this-is-what-happens-larry.html

Update 2: After little more than a year, the thing has rusted -- yes, rusted! -- badly enough to break apart.
http://sentimentalmechanic.blogspot.com/2010/12/raceland-header-rusts-and-breaks.html

Update 3: Raceland honored their 2-year warranty and sent me a new one.
http://sentimentalmechanic.blogspot.com/2010/12/warranty-honored-on-raceland-header.html

Friday, July 10, 2009

Style points

For nerd cred and to show off a bit of my national pride, I painted my calipers green and yellow: colors on the Brazilian flag.


My car is white, so that's covered, but where's the blue? Have a look:


Yup. Angry eyes in painter's tape. Win. Number of Jalopnik points gained: Zero. Total Jalopnik points: 126.

(For comparison, the ZX2 earns 25 points, the former Benz earns 70.)

Thursday, May 14, 2009

The magic of Dymo labels

I love Dymo labels. So does Amanda. I've had this toggle switch in my car since I bought it, and it was (gasp!) unmarked!

So, once I remembered that Dymo labels exist, I took it upon myself to mark the switch. What does it do? See for yourself.


Monday, March 9, 2009

Spelling fail

Ah, the wonders of wanting your car to be awesome, while making it clear that you're completely hopeless.


The car didn't have rims, though it did have sweet Altezzas.


Wednesday, March 4, 2009

Roll bar has arrived!


This is by far the biggest package I've ever had delivered to me. Despite its size, it's actually pretty easy to move. It's only 40 pounds. It's a roll bar for the Miata: the Hard Bar Sport model made by Hard Dog Fabrication. I hope to have it installed before I attend The Learning Curve, a 2-day instructional class through the SCCA of Chicago.

This is my first significant modification/upgrade to the Miata since I bought it in December, with hopefully many more upgrades to come. I'll have pictures when it's installed.